
Welcome to our guide on building an AI-powered Bitcoin price analysis tool. This tool is designed to fetch real-time Bitcoin prices and analyze them using AI to provide insights and recommendations. It’s an excellent project for those looking to combine financial data analysis with the cutting-edge capabilities of artificial intelligence. You can see it in action here.
Introduction
In this guide, I will walk you through creating this tool within a WordPress environment, making it a great addition to any cryptocurrency-related website or blog. We’ll use JavaScript for the frontend interactions, PHP for server-side logic, and connect to external APIs for fetching Bitcoin prices and performing AI-based analysis.
This tool is not just a practical asset for Bitcoin enthusiasts; it’s also a fantastic learning project that encompasses API integration, AJAX requests, and the utilization of AI for data analysis.
Prerequisites
In order to develop this tool you should know how to setup a WordPress-based staging website or development environment, and you should know how to obtain an OpenAI API Access.
You don’t have to be proficient in JavaScript, PHP or CSS. I generated most of the code with the help of chatGPT.
Still, I will list below some prerequisites that are good to have before embarking on this type of project.
| Prerequisite | Description | How to Acquire or Learn |
|---|---|---|
| Basic Understanding of WordPress | Familiarity with WordPress setup and plugin management. | WordPress Codex |
| Basic Understanding of JavaScript | Ability to write and understand JavaScript code, particularly AJAX requests. | Mozilla MDN Web Docs |
| Basic Understanding of PHP | Ability to write and understand PHP code, especially in the context of WordPress plugins. | PHP Manual |
| WordPress Site Setup | A running WordPress site where you can install plugins and add custom scripts. | WordPress.org |
| OpenAI API Access | An API key from OpenAI to use their GPT-3.5 model for analysis. | OpenAI API |
| Local Development Environment (Optional) | A local server setup for WordPress development (e.g., XAMPP, MAMP, LocalWP). | LocalWP |
| Code Editor | An editor to write and edit your code (e.g., VSCode, Sublime Text, PHPStorm). | Visual Studio Code |
When in doubt ask chatGPT for help:
Hello ChatGPT,

I am planning to develop a Bitcoin price analysis tool that will be integrated into a WordPress website. The tool should leverage the Coinranking API through RapidAPI to fetch historical prices of Bitcoin for the last year. Additionally, it should utilize the OpenAI GPT-3.5-turbo model to analyze the price data and provide trading recommendations.

Here's what I need:

Guidance on setting up the Coinranking API through RapidAPI: Please provide step-by-step instructions on how to sign up for RapidAPI, find the Coinranking API, and set it up to fetch historical Bitcoin price data. Include information on any specific parameters I should use for querying one year of data.

Instructions for integrating API data fetching into a WordPress site: I need to know how to integrate the API calls into my WordPress site. This includes creating a custom plugin or adding functions to my theme's functions.php file. Provide sample PHP code for making the API calls and handling the response data.

Overview of using the OpenAI GPT-3.5-turbo model for analysis: Explain how to set up an OpenAI account, obtain API keys, and make requests to the GPT-3.5-turbo model. I'm interested in sending the historical Bitcoin prices to the model and receiving trading recommendations.

WordPress integration for displaying analysis results: Provide guidance on displaying the analysis results from GPT-3.5 on the WordPress site. This could be through a shortcode, widget, or custom page template. Include sample code and instructions.

Best practices for security and performance: Offer advice on securing API keys, caching responses to improve performance, and ensuring the overall security of the WordPress site while using these integrations.

User interaction elements: Suggest how to design user interface elements like buttons or forms on the WordPress site that allow users to fetch the latest analysis or update the displayed data.

Thank you for your assistance in creating this Bitcoin price analysis tool.
In the next chapter, we will start setting up our development environment and prepare our WordPress site for the addition of our custom tool. Stay tuned!
Setting Up the Development Environment
Before we start coding, it’s essential to set up a proper development environment. This will include setting up your WordPress site locally (if you haven’t done so) and preparing it for the development of our AI-powered Bitcoin analysis tool.
Local WordPress Setup
If you don’t have a WordPress site set up locally, follow these steps to get started:
- Download and Install a Local Server Environment: Choose between XAMPP, MAMP, or LocalWP. These tools allow you to run a WordPress site on your computer.
| Tool | Platform | Download Link |
|---|---|---|
| XAMPP | Windows, Mac, Linux | Download XAMPP |
| MAMP | Windows, Mac | Download MAMP |
| LocalWP | Windows, Mac, Linux | Download LocalWP |
- Install WordPress: Follow the installation guide provided by your chosen local server environment to install WordPress.
- Access Your Local Site: Open your browser and go to the local address provided during the installation (usually
http://localhostor a custom one provided by LocalWP).
Preparing WordPress for Development
Once your local WordPress site is up and running, perform the following steps to prepare it for plugin development:
- Create a Child Theme (Optional but Recommended): This ensures that your changes are not overwritten by theme updates: WordPress Child Themes.
- Install Required Plugin:
For this project, we will use the WPCode plugin (formerly known as “Insert Headers and Footers”) which allows us to add both PHP and JavaScript snippets directly to your WordPress site without modifying theme files. This will be useful for integrating API calls and displaying data on your website.
WPCode:
- Description: Allows you to insert custom PHP and JavaScript in your WordPress site. It’s a versatile plugin that simplifies the process of adding code snippets.
- Installation Link: WPCode on WordPress Plugins
Steps to Install:
- Go to your WordPress admin dashboard.
- Navigate to ‘Plugins’ > ‘Add New’.
- Search for ‘WPCode’.
- Click ‘Install Now’ next to the WPCode plugin.
- After the plugin has been installed, click ‘Activate’.
Once activated, WPCode allows you to add custom PHP code snippets by navigating to ‘WPCode’ > ‘Snippets’ in your WordPress dashboard. There, you can create new snippets for your PHP code. For JavaScript and other header or footer scripts, you can go to ‘WPCode’ > ‘Header & Footer’ to add your scripts accordingly.
By using WPCode, you consolidate the functionality of adding custom PHP and JavaScript into one tool, making your WordPress environment cleaner and more manageable.
3. Enable Debugging: In your wp-config.php file, set WP_DEBUG to true. This helps in spotting any errors during development.
// Enable WP_DEBUG mode
define( 'WP_DEBUG', true );

// Enable Debug logging to the /wp-content/debug.log file
define( 'WP_DEBUG_LOG', true );
Now that your development environment is set up, you are ready to start building the Bitcoin price analysis tool.
Connecting to External APIs for Bitcoin Price Data
Fetching Bitcoin Data using Coinranking API
In this chapter, we’ll integrate the Coinranking API to fetch Bitcoin data for our tool. We’ll be using the Coinranking API available through RapidAPI. This API provides a wide range of data, including price information, market caps, and more. We will focus on retrieving the historical prices of Bitcoin for the last year.
Setting Up Coinranking API:
First, you need to obtain an API key from RapidAPI for accessing the Coinranking API. Follow these steps:
- Visit the Coinranking API page on RapidAPI.
- Sign up or log in to your RapidAPI account.
- Subscribe to the Coinranking API. You can start with the free plan which has a limited number of API calls per month.
- Note down your API key; you will need this to authenticate your requests.
Fetching Historical Bitcoin Prices:
Here we’ll go through the detailed process of creating and integrating the fetch_bitcoin_prices() PHP function within your WordPress site. This function is responsible for fetching the latest Bitcoin prices using the Coinranking API via PHP cURL, handling the response, and formatting the data for use in your tool.
PHP Function: Writing the fetch_bitcoin_prices() Function
First, let’s write our PHP function that will fetch Bitcoin prices:
function fetch_bitcoin_prices() {
    // Initialize cURL session
    $curl = curl_init();

    // Set cURL options
    curl_setopt_array($curl, [
        CURLOPT_URL => "https://coinranking1.p.rapidapi.com/coin/Qwsogvtv82FCd/history?referenceCurrencyUuid=yhjMzLPhuIDl&timePeriod=1y",
        CURLOPT_RETURNTRANSFER => true,
        CURLOPT_FOLLOWLOCATION => true,
        CURLOPT_ENCODING => "",
        CURLOPT_MAXREDIRS => 10,
        CURLOPT_TIMEOUT => 30,
        CURLOPT_HTTP_VERSION => CURL_HTTP_VERSION_1_1,
        CURLOPT_CUSTOMREQUEST => "GET",
        CURLOPT_HTTPHEADER => [
            "X-RapidAPI-Host: coinranking1.p.rapidapi.com",
            "X-RapidAPI-Key: Your_RapidAPI_Key"
        ],
    ]);

    // Execute the cURL request
    $response = curl_exec($curl);
    $err = curl_error($curl);

    // Close the cURL session
    curl_close($curl);

    // Check for errors and return the data
    if ($err) {
        error_log('cURL Error #:' . $err);
        return null; // Or handle error appropriately
    } else {
        // Decode the JSON response
        $data = json_decode($response, true);

        // Initialize an array to hold the Bitcoin prices
        $prices = [];

        // Check if the 'data' and 'history' keys exist to avoid errors
        if (isset($data['data']) && isset($data['data']['history'])) {
            // Loop through the history and extract each price point
            foreach ($data['data']['history'] as $pricePoint) {
                if (isset($pricePoint['timestamp']) && isset($pricePoint['price'])) {
                    // Convert timestamp to readable date
                    $date = date('Y-m-d', $pricePoint['timestamp']); // Only use 'Y-m-d' if you only need the date without the time
                    $prices[] = ['date' => $date, 'price' => round($pricePoint['price'], 5)]; // Round the price to 5 decimal places
                }
            }
        }

        // Return the collected prices
        return $prices;
    }
}
Setting Up cURL to Make API Requests
The PHP cURL extension allows you to make HTTP requests directly from PHP. In the code above:
- We initialize a cURL session using
curl_init(). - We set various options for the cURL session (like URL, return transfer, timeout, and headers including our API key) using
curl_setopt_array(). - We make the API request using
curl_exec()and capture any errors withcurl_error().
Handling the API Response and Extracting Bitcoin Prices
After executing the cURL request:
- We close the cURL session using
curl_close(). - We check for errors. If there’s an error, we log it using
error_log()and return null (or handle it as needed). - If there’s no error, we decode the JSON response using
json_decode()to turn it into an associative array. - We check if the necessary keys (‘data’ and ‘coins’) are present in the array to avoid accessing non-existent keys which could lead to errors.
- We extract the Bitcoin data, assuming Bitcoin is the first listed coin in the response. This might require adjustment based on the actual API response.
Error Handling and Logging
Error handling is crucial for debugging and ensuring the reliability of your application. In our function:
- We use
curl_error()to capture any cURL-specific errors. - We use
error_log()to write errors to the PHP error log. This can be instrumental when debugging issues with the API call. - We return null if there’s an error, but depending on your specific application’s requirements, you might want to return a default value, throw an exception, or handle errors differently.
Integration into WordPress
To use this function within WordPress:
- Go to your WordPress dashboard.
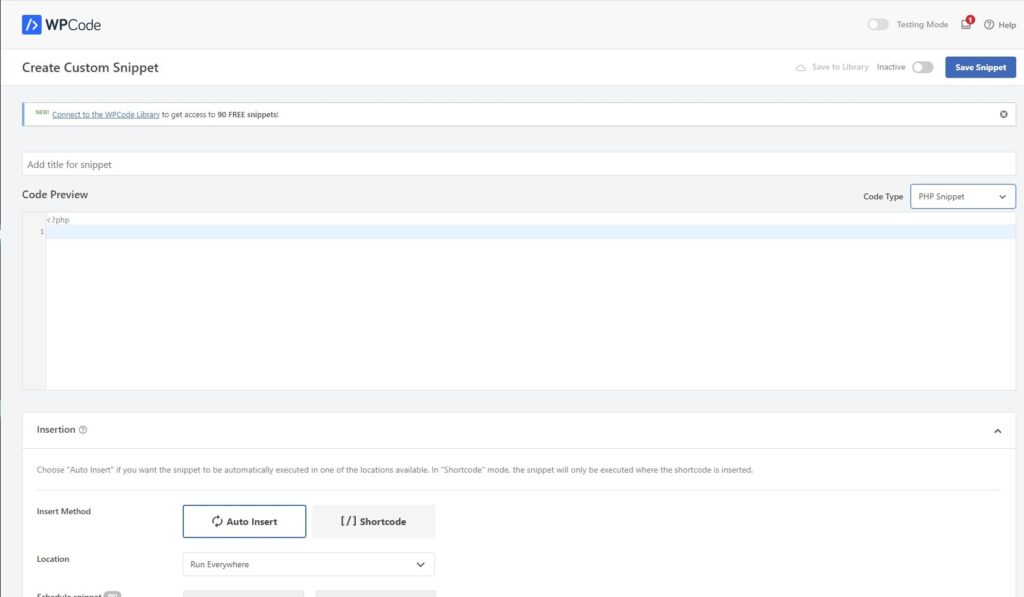
- Navigate to ‘WPCode’ > ‘Snippets’.
- Click on ‘Add New’ to create a new snippet.
- Paste the above PHP code into the code area.
- Name your snippet for future reference (e.g., “Fetch Bitcoin Historical Prices”).
- Set the snippet to run everywhere, or target specific locations as needed.
- Click ‘Save Changes’ and activate the snippet.
Now, fetch_bitcoin_prices() is available for use within your WordPress site. You can call this function whenever you need to fetch the latest Bitcoin prices and integrate them into your tool or display them on your website.
Creating AJAX Requests in WordPress
After setting up the PHP function to fetch historical Bitcoin prices, the next integral part is making AJAX requests from your site to this PHP function. In this scenario, instead of traditionally enqueuing scripts through functions.php, we’ll leverage WPCode to directly inject our JavaScript for AJAX operations.
Prerequisites:
- Ensure you have the PHP function (
fetch_bitcoin_prices()) correctly set up and tested. - Make sure jQuery is loaded on your WordPress site as we’ll use it for AJAX requests. WordPress usually includes jQuery by default.
- Confirm that WPCode plugin is installed and activated on your WordPress site.
Step 1: Add JavaScript for AJAX
- Navigate to the WPCode dashboard in your WordPress admin area.
- Create a new ‘Footer’ snippet to ensure the script loads at the end of your page (which ensures jQuery is already loaded).
- In the new snippet, paste the following JavaScript code:
<script>
jQuery(document).ready(function($) {
    $('#fetch-prices-btn').click(function(e) {
        e.preventDefault();
        var button = $(this);
        button.prop('disabled', true).text('Fetching...'); // Disable button and change text

        $.ajax({
            type: 'POST',
            url: ajaxurl, // WordPress automatically defines this variable for AJAX
            data: {
                action: 'fetch_bitcoin_prices', // Must match the WP hook
            },
            success: function(response) {
                $('#prices-display').empty();
                response.forEach(function(price) {
                    $('#prices-display').append('<p>Date: ' + price.date + ', Price: ' + price.price + '</p>');
                });
                button.prop('disabled', false).text('Fetch Bitcoin Prices'); // Re-enable button
            },
            error: function() {
                alert('Error fetching Bitcoin prices');
                button.prop('disabled', false).text('Fetch Bitcoin Prices'); // Re-enable button
            }
        });
    });
});
</script>
In this script:
#fetch-prices-btnshould be the ID of your button in the HTML used to trigger the price fetch.#prices-displayshould be the ID of the container where you want to display the fetched prices.- Adjust the data processing in the
successfunction according to your specific needs and response format.
Step 2: Link JavaScript to WordPress AJAX
In WordPress, to create a connection between your JavaScript and PHP for AJAX requests, you typically use the wp_ajax_ and wp_ajax_nopriv_ actions in your PHP code. These actions allow you to register PHP functions that respond to AJAX requests initiated from your JavaScript.
Hooking the PHP function to WordPress AJAX: After defining fetch_bitcoin_prices(), we need to tell WordPress that this function should be called when a specific AJAX request is made. This is done by hooking our PHP function to WordPress using add_action(). You would add these lines somewhere in your PHP code (which, in our context, you would add using the WPCode plugin):
add_action('wp_ajax_fetch_bitcoin_prices', 'fetch_bitcoin_prices');
add_action('wp_ajax_nopriv_fetch_bitcoin_prices', 'fetch_bitcoin_prices');
These lines register fetch_bitcoin_prices() as the handler function for AJAX requests made to the action fetch_bitcoin_prices. The wp_ajax_ hook listens for requests from logged-in users, while wp_ajax_nopriv_ listens for requests from users who are not logged in.
Analyzing Bitcoin Prices with AI
In this chapter, we’ll discuss how to create a PHP function that utilizes the OpenAI API to analyze Bitcoin prices. This function will construct a prompt, send it to the GPT-3.5 model via the OpenAI API, and handle the response. We will focus on the analyze_bitcoin_prices_with_gpt() function.
PHP Function: Writing the analyze_bitcoin_prices_with_gpt() Function
- Function Overview: The
analyze_bitcoin_prices_with_gpt()function is responsible for sending historical Bitcoin price data to the OpenAI API and retrieving an analysis. This analysis will be based on technical indicators or patterns found in the data. - Constructing the Analysis Prompt: First, we need to construct a prompt that includes the historical Bitcoin price data and asks for a technical analysis. This prompt should be designed in a way that the AI understands it is analyzing Bitcoin prices and should provide insights or recommendations based on this data.
Step 1: Constructing the Analysis Prompt
The first step in analyzing Bitcoin prices with AI is to construct a prompt that we will send to the OpenAI API. This prompt will instruct the AI on what we want to analyze and how.
In our PHP function analyze_bitcoin_prices_with_gpt(), we construct the prompt using historical Bitcoin prices:
$priceList = array_map(function($price) {
    return "Date: {$price['date']}, Price: {$price['price']}";
}, $prices);

$prompt = "Analyze the provided historical Bitcoin prices and provide a buy or sell recommendation based on trend analysis and 50 and 200 days moving averages. Consider factors such as price fluctuations, significant trends, and patterns observed from the historical data. Begin with a definitive buy or sell recommendation, followed by a succinct explanation based on observed price movements and trends. Here are the historical prices: \n" . implode("\n", $priceList);
This prompt asks the AI to consider technical indicators such as moving averages while providing a clear buy or sell recommendation based on the historical price data we pass.
Step 2: Setting Up cURL for OpenAI API Call
To send our analysis prompt to the OpenAI API, we use PHP’s cURL functions. We set up a cURL session and configure our request to the OpenAI API endpoint for chat completions:
$ch = curl_init();
curl_setopt_array($ch, [
    CURLOPT_URL => 'https://api.openai.com/v1/chat/completions',
    CURLOPT_RETURNTRANSFER => true,
    CURLOPT_FOLLOWLOCATION => true,
    CURLOPT_ENCODING => '',
    CURLOPT_MAXREDIRS => 10,
    CURLOPT_TIMEOUT => 30,
    CURLOPT_HTTP_VERSION => CURL_HTTP_VERSION_1_1,
    CURLOPT_CUSTOMREQUEST => 'POST',
    CURLOPT_POSTFIELDS => json_encode([
        'model' => 'gpt-3.5-turbo',
        'messages' => [
            ['role' => 'system', 'content' => 'You are a knowledgeable crypto analyst.'],
            ['role' => 'user', 'content' => $prompt]
        ],
        'max_tokens' => 1024,
        'temperature' => 0.5,
    ]),
    CURLOPT_HTTPHEADER => [
        'Content-Type: application/json',
        'Authorization: Bearer YOUR_OPENAI_API_KEY'
    ],
]);
In this setup, replace YOUR_OPENAI_API_KEY with your actual API key from OpenAI.
Step 3: Processing the OpenAI Response
After executing the cURL request, we check for errors and process the response from the OpenAI API:
$response = curl_exec($ch);
$err = curl_error($ch);
curl_close($ch);

if ($err) {
    return 'cURL Error #:' . $err;
} else {
    $responseArray = json_decode($response, true);
    return isset($responseArray['choices'][0]['message']['content']) ? trim($responseArray['choices'][0]['message']['content']) : 'No response from GPT-3.5';
}
This part of the function decodes the JSON response and extracts the AI’s analysis. If there’s no error and the response contains the analysis, we retrieve it; otherwise, we handle the case where no response is returned.
Implementing the Function in WordPress
Once your analyze_bitcoin_prices_with_gpt() function is complete, you can implement it within your WordPress site. Use the WPCode plugin to add this function to your site without editing theme files directly. You can add it to the same snippet where you’ve also added the fetch_bitcoin_prices() function.
This PHP function integrates with the OpenAI API to provide an automated analysis of Bitcoin prices. By sending properly constructed prompts and interpreting the responses, we can offer valuable insights directly from our WordPress website. Remember to handle errors appropriately and ensure that your API key is kept secure.
Extending the AJAX Request to Handle Analysis
After fetching the historical Bitcoin prices, the next step is to send this data for AI analysis and display the analysis results on the front end. This chapter guides you through creating the AJAX request that interacts with our AI analysis PHP function and updating the webpage with the received insights.
Prerequisites:
- Ensure you have completed the previous chapters, especially the one related to fetching Bitcoin prices and setting up AJAX requests.
- Ensure the WPCode plugin is installed and active, and the necessary PHP code for fetching and analyzing Bitcoin prices is correctly added to your WordPress site.
Step 1: Extending the AJAX Request for Analysis
We’ll modify our existing JavaScript to include a new function that sends the fetched Bitcoin prices to our PHP function for AI analysis. Below is the JavaScript that adds this functionality:
// Handle the "Analyze Prices with AI" button click
$('#analyze-prices').click(function() {
    var $btn = $(this);
    $btn.prop('disabled', true).addClass('loading');

    var prices = [];
    $('#prices-table tr').each(function() {
        var date = $(this).find('td:eq(0)').text();
        var price = $(this).find('td:eq(1)').text().replace('$', '');
        if (date && price) {
            prices.push({ date: date, price: parseFloat(price) });
        }
    });

    // Send the prices for AI analysis
    $.ajax({
        url: ajaxurl,
        type: 'POST',
        dataType: 'json',
        data: {
            action: 'analyze_bitcoin_prices', // This should match the action hooked in WordPress
            prices: JSON.stringify(prices)
        },
        success: function(response) {
            $('#analysis-result').html(response.replace(/\n/g, '<br>')); // Format and display the result
        },
        error: function() {
            alert('Failed to analyze prices. Please try again.');
        },
        complete: function() {
            $btn.prop('disabled', false).removeClass('loading');
        }
    });
});
In this script, when the “Analyze Prices with AI” button is clicked:
- It disables the button to prevent multiple clicks.
- Collects the Bitcoin prices displayed on the page.
- Sends the collected prices to the
analyze_bitcoin_pricesAJAX action, which is connected to ouranalyze_bitcoin_prices_with_gpt()PHP function. - On success, it formats and displays the AI’s analysis in the designated HTML element.
- Re-enables the button once the AJAX call is complete.
Step 2: Displaying the Analysis Results
The success function of the AJAX call handles the display of the analysis results. The line $('#analysis-result').html(response.replace(/\n/g, '<br>')); converts newline characters in the AI’s response into HTML line breaks, making the analysis readable on the webpage.
Step 3: Adding Loading Feedback
To improve user experience, we add a loading state to the “Analyze Prices with AI” button while the AJAX request is processing. This is achieved by adding .addClass('loading') when the button is clicked and .removeClass('loading') once the request is complete. You may need to add corresponding CSS for the loading state, for example:
.btn.loading {
    background-color: #ccc;
    cursor: default;
}
This CSS changes the button’s color and cursor when it’s in the loading state, indicating to the user that the analysis is in progress.
By extending our AJAX functionality, we’ve enabled our website to send Bitcoin price data for AI analysis and display the insights directly on the front end. This integration provides users with valuable AI-generated investment insights without leaving your WordPress site.
Ensure all code is tested in a safe development environment before deploying to your live site. This approach keeps the user experience seamless while offering powerful, AI-driven financial analysis directly within your WordPress website.
Enhancing User Interface
After ensuring the back-end functionalities like fetching Bitcoin prices and analyzing them with AI are in place, it’s crucial to provide users with an intuitive and visually appealing interface. This chapter delves into the structuring of the page layout and the styling of page elements.
HTML: Structuring the Page Layout
The layout structure is crucial for user experience. The design should be simple yet functional, allowing users to easily interact with the tool. Below is an example HTML structure for our Bitcoin analysis tool:
<div class="crypto-analysis-intro">
    <h1>Bitcoin Price Analysis Tool</h1>
    <p>Explore our dynamic Bitcoin evaluation platform! This tool allows you to retrieve up-to-date Bitcoin values and provides guidance on whether to buy or sell based on analytical assessments of market trends.</p>
<p><em>Note: This utility is designed solely for instructional use and should not be construed as financial counsel.</em></p>
</div>
<div class="crypto-analysis-controls">
    <button id="fetch-prices" class="btn">Fetch Bitcoin Prices</button>
    <button id="analyze-prices" class="btn">Analyze Prices with AI</button>
</div>
<div class="crypto-analysis-results">
    <div id="prices-table"></div>
    <div id="analysis-result"></div>
</div>
In this structure:
- The
.crypto-analysis-introcontains introductory text and a disclaimer. - The
.crypto-analysis-controlscontains buttons to interact with the tool (fetch prices and analyze). - The
.crypto-analysis-resultswill display the fetched Bitcoin prices and the analysis results.
CSS: Styling the Page Elements
Good styling enhances the readability and interaction with the tool. Below is an example CSS to style our Bitcoin analysis tool:
.crypto-analysis-intro,
.crypto-analysis-controls,
.crypto-analysis-results {
    margin-bottom: 20px;
    padding: 15px;
}

.crypto-analysis-intro h1 {
    margin-bottom: 0.5em;
}

.crypto-analysis-intro p,
.crypto-analysis-results div {
    margin-bottom: 1em;
}

.btn {
    background-color: #4CAF50;
    color: white;
    padding: 10px 20px;
    border: none;
    cursor: pointer;
    margin-right: 10px;
}

.btn:hover {
    background-color: #45a049;
}

#prices-table,
#analysis-result {
    background-color: #f9f9f9;
    border-radius: 5px;
    padding: 20px;
}

#prices-table th,
#prices-table td,
#analysis-result {
    text-align: left;
    padding: 8px;
}

@media (max-width: 500px) {
    .btn {
        margin-bottom: 10px;
        margin-right: 0;
        width: 100%;
    }
    .crypto-analysis-controls {
        flex-direction: column;
    }
}
In this CSS:
- Margins, paddings, and background colors are used to space out elements and group related items visually.
- The
.btnclass styles the buttons to be more engaging and to provide visual feedback when hovered. - The
#prices-tableand#analysis-resultare styled to distinguish them from the rest of the content. - A media query adjusts button layouts for better usability on smaller screens.
Proper structuring and styling of the page enhance user engagement and readability. By following the HTML and CSS examples provided, users will find the Bitcoin analysis tool intuitive and easy to use, enhancing their overall experience on your WordPress site.
Ensure that all HTML and CSS code is thoroughly tested on different devices and browsers to guarantee a responsive and accessible interface for all users.
Best Practices and Tips
This chapter aims to guide you through several best practices and tips that can help you enhance the security, efficiency, and performance of your Bitcoin price analysis tool.
Securing Your API Keys
- Environment Variables: Instead of hard-coding your API keys into your source code, store them as environment variables. This approach not only keeps your keys secure but also makes it easier to update them without changing your code.Implementation Tip: In WordPress, you can define environment variables in the
wp-config.phpfile. Add lines like the following:
define('COINRANKING_API_KEY', 'your_coinranking_api_key_here');
define('OPENAI_API_KEY', 'your_openai_api_key_here');- Access Control: Restrict the access to your API keys based on IP addresses, domains, or other security measures provided by your API providers. This minimizes the risk of unauthorized use.
- Regular Rotation: Regularly update or rotate your API keys to reduce the risks associated with key exposure over time.
Optimizing API Request Rates
- Caching: Implement caching mechanisms to store API responses for a certain period. This can significantly reduce the number of requests sent to the API, thereby staying within rate limits and reducing latency.Example: In WordPress, you can use transients to cache data:
$cached_prices = get_transient('cached_bitcoin_prices');
if (!$cached_prices) {
    // Fetch new data and cache it
    $cached_prices = fetch_bitcoin_prices(); // Your custom function
    set_transient('cached_bitcoin_prices', $cached_prices, HOUR_IN_SECONDS);
}
- Rate Limiting: Implement client-side rate limiting to avoid surpassing the API’s rate limits. Consider using a queue or a scheduler to manage requests efficiently.
Handling Large Datasets and Long Response Times
- Pagination and Chunking: When dealing with large datasets, use pagination or chunking techniques to fetch data in segments, reducing the load on both the server and the API.
- Asynchronous Requests: Utilize asynchronous requests to prevent blocking the user interface while data is being fetched. This improves the user experience by allowing the interface to remain responsive.
- Timeouts and Error Handling: Implement proper timeout settings and error handling for your API requests. This ensures that your application can gracefully handle issues such as slow response times or server errors. Example:
$curl = curl_init();
curl_setopt($curl, CURLOPT_TIMEOUT, 30); // Set a timeout for the request
// Other cURL settings...

$response = curl_exec($curl);
if (curl_errno($curl)) {
    // Handle errors appropriately
    error_log('cURL error: ' . curl_error($curl));
}
- User Feedback: Provide users with feedback, such as loading indicators or progress bars, when processing large datasets or during lengthy operations. This informs them that the system is working and improves their overall experience.
By implementing these best practices and tips, you can enhance the functionality, security, and user experience of your Bitcoin price analysis tool. Always stay updated with the latest best practices in web development and API usage to maintain and improve the quality of your tool.
Conclusion
This guide has walked you through the step-by-step process of creating a Bitcoin price analysis tool, which is integrated into a WordPress website.
We covered setting up the necessary environment, fetching Bitcoin prices using the Coinranking API, analyzing these prices with AI through the OpenAI API, and displaying the results interactively on the frontend.
Summary of Key Points:
- Prerequisites: Setting up your WordPress environment and understanding the basic requirements.
- Fetching Bitcoin Prices: Creating PHP functions to fetch historical Bitcoin prices using the Coinranking API.
- Analyzing Bitcoin Prices with AI: Writing PHP functions to analyze the fetched prices with GPT-3.5 AI and constructing prompts for insightful trading recommendations.
- Frontend Interaction: Implementing JavaScript and AJAX to interact with the PHP functions and update the webpage dynamically.
- User Interface: Designing a user-friendly interface using HTML and CSS.
- Best Practices and Tips: Enhancing the security, efficiency, and performance of the tool.
Potential Expansions and Customizations:
- Data Visualization: Implement charting libraries to visualize the price trends and analysis results, making the data easier to understand at a glance.
- Additional Cryptocurrencies: Expand the tool to cover multiple cryptocurrencies, allowing users to select which cryptocurrency they wish to analyze.
- Advanced Technical Analysis: Integrate more complex technical analysis indicators and methods to provide more comprehensive trading insights.
- Real-time Data: Upgrade the tool to fetch and analyze real-time data for up-to-the-minute recommendations.
- User Customization: Allow users to customize the analysis parameters, such as selecting different time ranges or technical indicators according to their preferences.
- Localization and Internationalization: Adapt the tool for different markets by incorporating multi-language support and converting prices to various currencies.
By following this guide, you now have a foundational Bitcoin price analysis tool that you can further develop and customize to meet your needs or the needs of your audience.
The combination of WordPress, Coinranking API, and OpenAI provides a robust framework for creating sophisticated financial analysis tools. Keep exploring and experimenting with new features and technologies to enhance your tool and provide more value to your users.
Leave a Reply